7 Ways to Teach Kids About Easter

7-Ways-to-Teach-Kids-About-Easter.jpg

Easter is about Jesus. It's about the sacrifice he made on the cross and his victory over death three days later. It can be difficult, to say the least, to explain these concepts to small children, so I've gathered seven different activities from all over the web to help you.

Don't think for a minute that we do every single one of these in our home. We don't. I'm not superwoman. I'm just a mom trying to point my children toward Jesus on one of the most important days of the year. Sometimes we do that by reading a book, sometimes through making resurrection rolls, and sometimes through Easter crafts. It's all about finding what works best for your family and going for it.

So, without further ado, here are a few simple activities you can use to teach your children about Easter.

1. Make Resurrection Rolls. I've done this with Micah on the Saturday before Easter for the past couple of years. She loves dipping the marshmallows in butter and rolling them in cinnamon sugar before wrapping them up in crescent rolls. These are a great object lesson for Jesus' burial and resurrection. The marshmallow is Jesus, the butter and cinnamon sugar are the oil and spices used to anoint his body, the crescent roll is the tomb. While the rolls bake, the marshmallow melts and leaves the inside hollow, representing the empty tomb. These are hands down our favorite Easter activity. Eat at Allie's has a great tutorial and recipe for Resurrection Rolls with step by step instructions.

2. Read Books that Explain the Resurrection Story. My Easter Basket and the True Story of Easter is one of our favorites. We picked it up at a consignment store when Micah was teeny tiny, and we love it. The story uses the colors in the basket and an easy-to-remember rhyme to describe the important parts of the Easter story.

3. Countdown to Easter. I love the idea of counting down to Easter with an Easter calendar - just like we count down to Christmas with an Advent calendar. Kojo Designs created the Easter egg countdown pictured here, and her tutorial includes a list of activities to hide in the eggs each day. We haven't done this in the past, but as my girls get older, I think it's something we'll try to incorporate into our traditions.

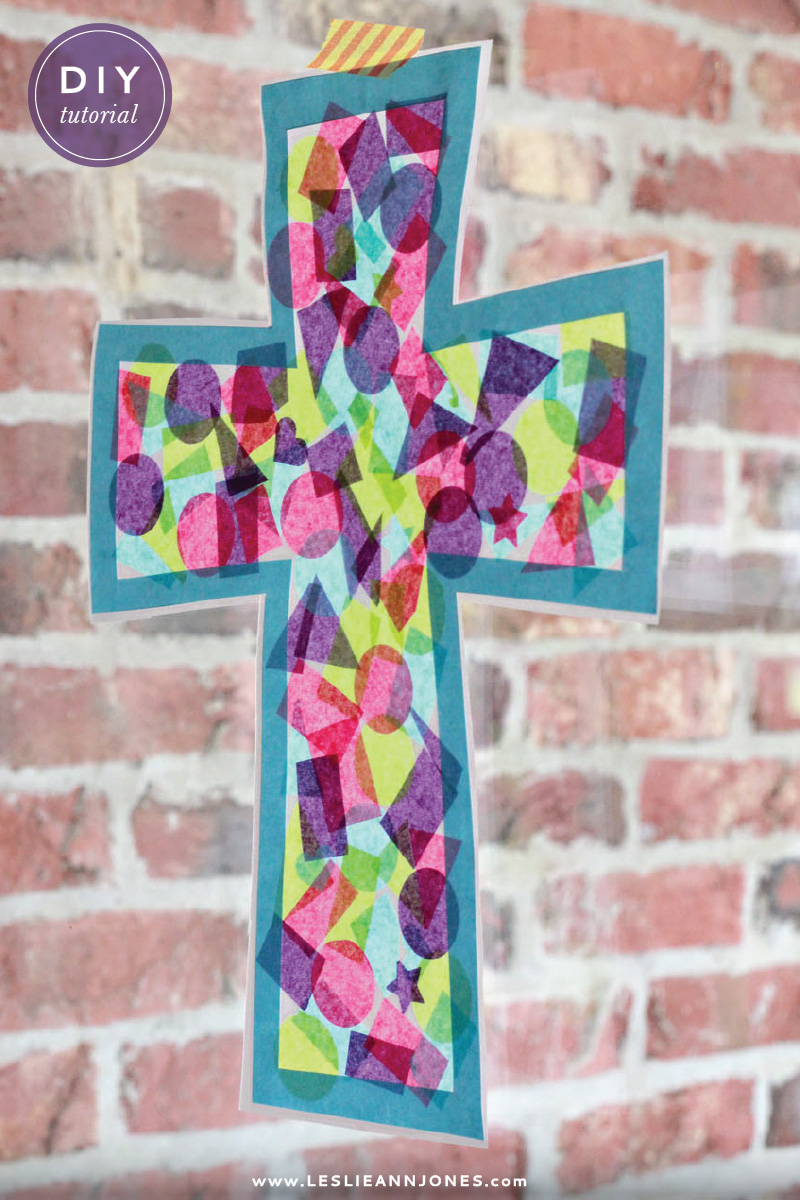
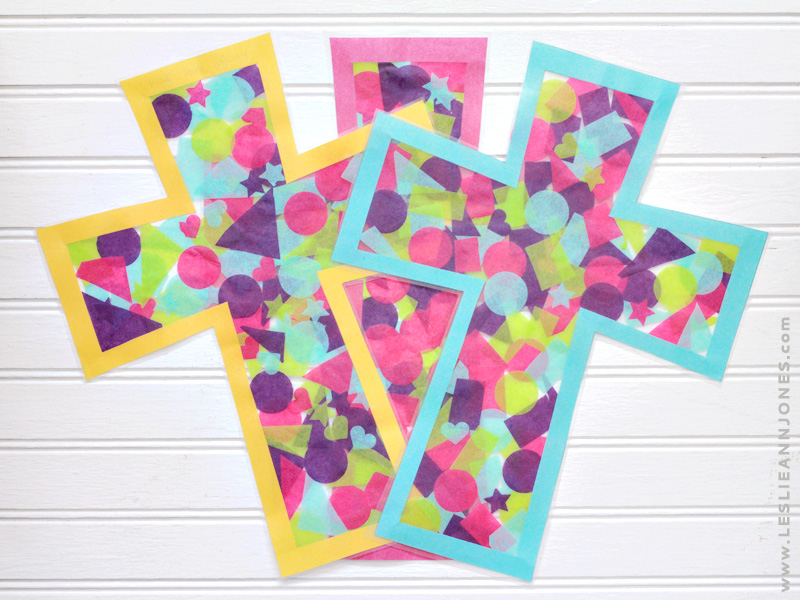
4. Make Faux Stained Glass Crosses. The cross is central to the Easter story, and you can talk about it with your children while you make these pretty and simple confetti stained glass crosses. We did this a few weeks ago, and both girls enjoyed it immensely. It's an easy enough craft for Kendall (who's almost two) to do, and Micah had a great time as well. The crosses are currently hanging on the back door, serving as a visual reminder that Easter is right around the corner.

5. Use Resurrection Eggs to Share the Story of Easter. This is a simple and beautiful concept that you can use to point your children toward Scripture and Jesus this season. You can buy a set of resurrection eggs to use, or, if you're feeling crafty, you can make your own like these from sugar lander, these from Delia Creates, or these from Life Your Way. Mandi at Life Your Way even provides little printable cards for each egg to explain the contents and the corresponding Scripture. So cute.

6. Create a Resurrection Garden. If I can manage to swing it, we're going to make one of these this year. I've seen several versions floating around Pinterest, but my favorite is this resurrection garden from Oh Amanda. I love the fact that she replaced the wilted, dying foliage with vibrant, colorful flowers on Easter morning, a visual reminder of the new life we have in Christ. This seems like a really fun way for kids to get their hands dirty and really get a sense of what Easter is all about.

7. Use A Sense of the Resurrection to Direct Your Conversations. A Sense of the Resurrection is a fantastic e-book by Oh Amanda that includes tutorials for 12 Scripture-based Easter activities to do with your children. Some of the activities are simple, like washing each others' feet as you explain that Jesus washed the feet of the disciples on the night he was arrested. Other activities are more involved, like the wind chime you can make to remember the Triumphal Entry. All the activities will help your children understand the different parts of the Easter story and give them an appreciation for what Jesus did on the cross.

post-separator.png

I hope this collection is helpful for you as you talk about Easter with your little ones. What do you do to prepare your kids for Easter? Share your ideas and inspiration in the comments section.

image credits: 1 2 3 4 5 6 7

Find More Easter Ideas on my Happy Easter Pinboard!

Until next time, grace and peace.

This is the Day: On Rejoicing and Being Glad

this-is-the-day

I've been trying to write this post for five days now. I wanted to tell you about an...ahem...adventurous trip to Wal-Mart with the girls that involved an obnoxious singing birthday card, open food in the cart (that we hadn't yet paid for), and a 4-year-old who insisted on singing the echo song (aka "This is the Day") at the top of her lungs.

I didn't feel very much like rejoicing and being glad that day. I just wanted to get the heck out of the store.

In retrospect, I was more than a little ashamed that I snapped at Micah when she asked me to sing with her, because really, nothing about my day was all that bad. I should have been able to praise God in the middle of Wal-Mart with her. Instead, I let my stress get the better of me, and I refused to sing.

So I was going to tell you all about that trip to the store, and I was going to be thoughtful and reflective and insightful and remind you that THIS is the day that the Lord has made. No matter what happens, we should rejoice and be glad in it.

But it just wasn't clicking for me. I couldn't find the words that I wanted to say. And so I've said nothing. Thinking that the words would eventually come. Thinking that I should save the post for a day when I feel more like praising God.

And then came yesterday. And I realized that if I waited until I felt like it to finish this post, we'd be waiting for a long time.

Yesterday didn't get off to such a bad start. I was mildly productive while Micah was at preschool, and Kendall was happy to play with blocks while I worked. I had big plans for the afternoon. Plans of catching up on some #LentChallenge reading, working on this here blog post, and designing a few new submissions for Minted if time permitted.

But time did not permit, because I picked up a sick little girl from preschool. A girl with a 102 degree fever, a sore throat, and an upset tummy. Instead of reading the Bible, I cleaned up vomit. Instead of writing a blog post, I held my girl. Instead of designing cards, I doled out saltines.

Not exactly inspiration for praising God.

But here's the thing. If I can't find it within me to praise God after a normal trip to the grocery store with a couple of kids in tow or an afternoon that went slightly awry, then how in the world will I find it within me to praise the Lord when something really goes wrong?

Because someday it will. That's just life.

God is good. All the time. When the sun is shining and when the rain is falling, God is good. He is good when the sun comes up each morning and when it goes down each night. He is good when everything goes as planned and when everything falls apart. His goodness isn't dependent on my circumstances. No matter how I feel, no matter what things look like, He is good. That's the truth of the matter, and that's reason enough to praise Him.

And so today, I will rejoice and be glad. Even though I spent two hours at the pediatrician's office with one sick kid and one toddler who's into everything. Even though I had to hold Micah down kicking and screaming while the nurse jabbed a shot of penicillin in her thigh. Even though our subsequent trip to Chick-fil-A was kind of a disaster.

Even though I don't feel much like praising Him, I'll do it anyway.

Because we have a good and kind doctor and affordable healthcare. Because we have access to effective medicine that does away with nasty things like strep throat. Because we have the luxury of stopping in for ice cream when we're having a bad day. And most importantly, I will praise Him because He is God, and He is good. Always and forever. He is good.

I suppose I could moan and sigh and complain about how nothing is going my way, but would that help anything really? I think not. Fake it til you make it, I say. Who knows? Maybe once you start praising, you won't feel like stopping. Trust me on this. It works for me.

Until next time, grace and peace.
DIY Confetti Stained Glass Cross Tutorial

diy-faux-stained-glass

When I started thinking of things I could do to prepare my girls for Easter, this simple faux stained glass cross came to mind. I remember making these at church when I was a little girl, and working on them with my girls brought back fond memories.

This craft is super simple and lots of fun for busy little fingers. I took care of all the cutting for the girls, and they had a ball placing the confetti and decorating their crosses. Sadly, I didn't get any pictures of them at work. I was too busy being a mom! Next time.

To make some confetti stained glass crosses of your own, you'll need the following materials:

Let's get started!

Stained-Glass-Easter-Cross-Tutorial

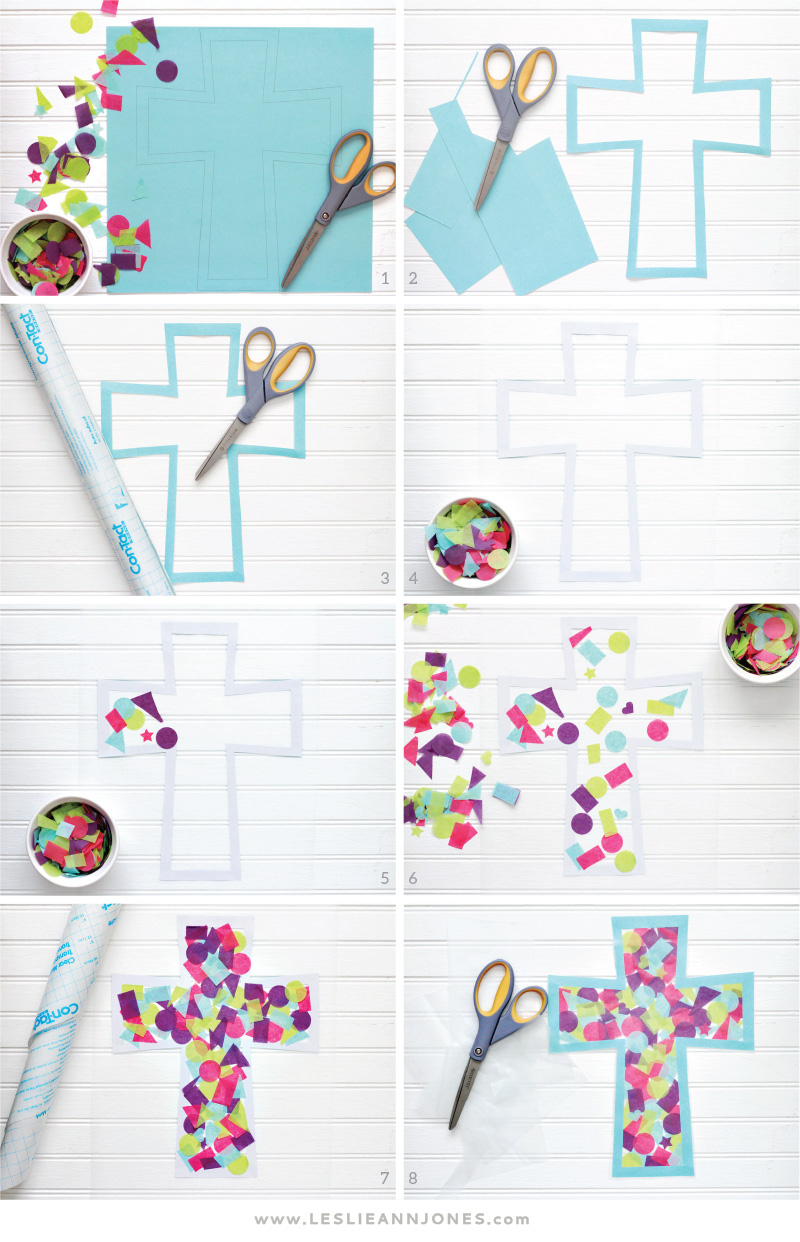
Step 1 // Gather your materials and print the cross template on colored paper. If you want to use scrapbook paper, but your your printer won't allow you to print on 12x12 paper, you can always use the template as a guide to draw your own crosses by hand.

Step 2 // Next, cut along the line for the outer cross. When you finish, cut out and remove the inner cross.

Step 3 // Carefully peel the backing off one sheet of contact paper.

Step 4 // Place the cross border facedown on the sticky side of the contact paper, smoothing out any wrinkles as you go.

Step 5 // Begin placing tissue paper confetti inside the border.

Step 6 // Cover the entire cross with confetti.

Step 7 // Peel the backing off the other sheet of contact paper and gently smooth it over the back of your cross.

Step 8 // Trim the excess contact paper, and your cross is complete!

contact-paper-stained-glass-cross

I hope you enjoy making these crosses with these little ones! May they brighten up your home throughout the entire Easter season.

If you liked this project, you should browse through the rest of my tutorials. Don't forget to sign up to get updates in your inbox and never miss a tutorial!

Until next time, grace and peace.