
Baby girl's first birthday bash is right around the corner, which means that party preparations are in full swing. Planning Micah's birthday party has meant designing a new party suite for this paper fanatic, and I've had a lot of fun planning the little details of her big day. It's the little things that make an event special, you know.
I've been seeing these tissue paper pomander balls all over the blogosphere, and, with a little help from Martha, I turned out a slew of them this weekend. I love how whimsical and playful they are, and I can't wait to decorate with them in a few weeks. If you're looking for a fun way to add a little flair to your special event, make a few of these pom-poms. You'll be surprised at how easy they are!

First, as the Pioneer Woman would say, the cast of characters. You'll need eight sheets of tissue paper. I used 15x20 sheets for the large pom-poms, 10x15 sheets for the medium pom-poms, and 7.5x10 sheets for the small pom-poms. You'll also need scissors and floral wire.

Stack all eight sheets of paper and fold it accordian-style. On the largest pomanders, I made 1-inch folds, but on the smallest ones, I used 1/2-inch folds. It's really up to you. The smaller the folds, the harder it is to separate the layers later, so keep that in mind as you're folding.

Secure your folded paper with about six inches of floral wire, twisting tightly to secure. I plan to suspend the pom-poms from fishing line, so I left enough wire to make a loop and hang, but do whatever you need. If you don't have floral wire, just improvise and use some twist ties from the kitchen. That will work just fine.

Trim the ends of your paper with scissors. This is honestly the hardest part. I chose to round the ends, but the pomanders are also very pretty with pointed ends. Trim according to your preference.
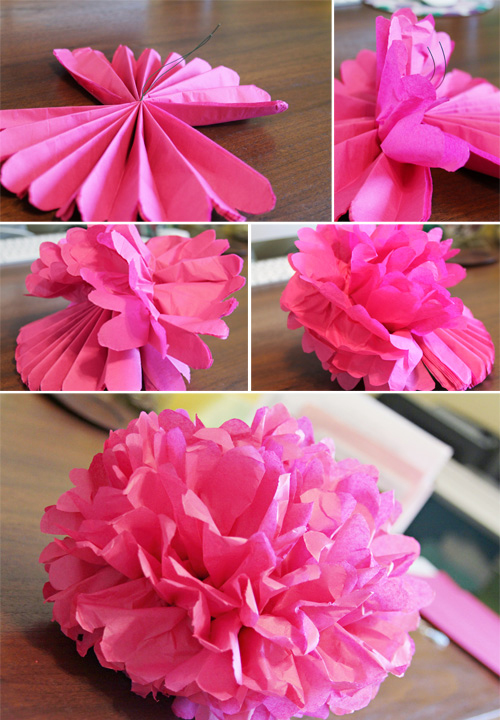
After you've trimmed the ends, fan out the folded paper and carefully separate the layers of tissue paper. The paper is very delicate, so use a gentle hand when separating the paper. I found it easiest to alternate sides as I pulled the paper apart. After you've separated all the layers, fluff and shape the pomander until it looks good, then step back and admire your handiwork!
When you hang these with fishing line, they appear to float in midair, but they also look really cute when hung with ribbon. You can fill a clear glass vase with tiny pom-poms and use it as a centerpiece, or you can use medium-sized ones as napkin rings. The options are really limitless.
I've had fun with this little project, and I hope you have too! Happy crafting!
Until next time, grace and peace.